Feature Class Template
- Use the Feature Classes page to configure the dataset/layer that will contain the collected mapping features from the mobile field app.
- Geolantis.360 offers a variety of standard feature class templates that can be used for surface and subsurface utility mapping.
- Based on the purpose of the mapping project, certain feature class can be selected in the mobile field app to start mapping features.
For example:
The feature class „Street Light“ should be selected for mapping the location of street light poles
The feature class „Street Lightning Cable“ should be selected for mapping the subsurface street lightning power cable¹
Managing Feature Classes
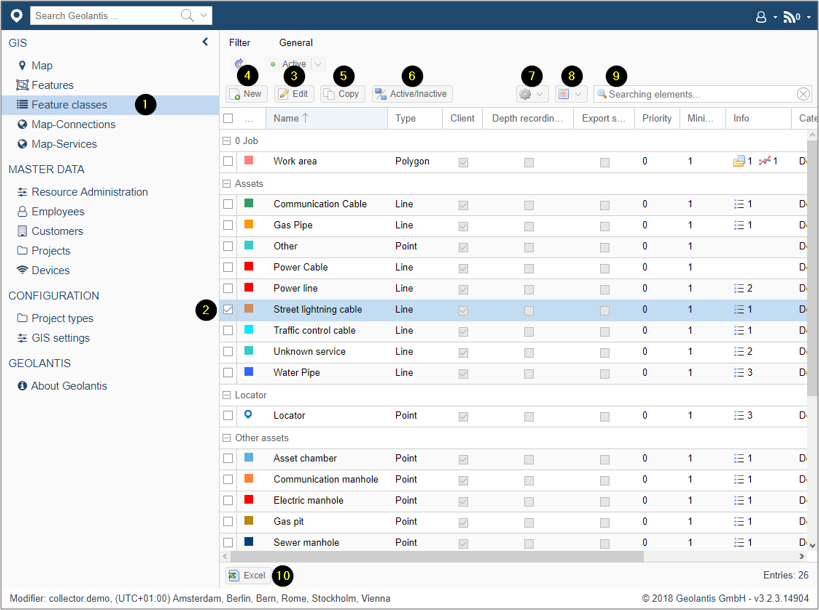
- Go to Feature Classes
- Select feature class
- Click Edit to configure feature class template, or
- Click New to create a feature class
- Click Copy to duplicate and configure feature class
- Activate/Inactivate feature class²
- Apply bulk changes to multiple selected feature classes
- Adjust displayed columns of the feature classes list
- Use the search bar to find specific feature class
- Export feature class list to Excel file
Feature Class Essential Configuration
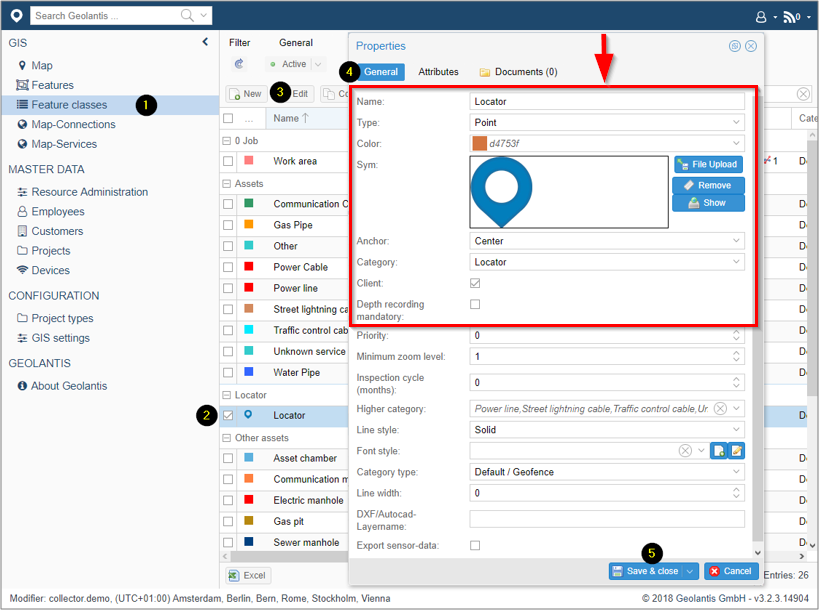
1. Go to Feature Classes page
2. Select feature class
3. Click Edit to configure feature class
4. Define the following essential feature class properties in the General tab:
| Name | Write feature class name (mandatory) |
| Type | Choose geometry type (point/line/polygon) |
| Color | Define feature class color (display color of collected features) |
| Client | Check to force layer display in the mobile app |
| Depth recording mandatory | Check to force recording depth value of subsurface features in the mobile field app |
5. Save and close properties window
Feature Class Additional Configuration
Define the following additional feature class properties if needed:
| Sym | Choose PNG display symbol for point features instead of solid color (optional) |
| Anchor | Text, Symbol insertion point |
| Category | Choose or define new categorry |
| Priority | Define layers overlay z-index display order |
| Minimum zoom level | From which zoom level on, the objects are displayed |
| Higher Category | Define parent Line feature classesFeature classes)
Use only for „Locator“ feature class to link with line features |
| Line style | Define line display style (solid/dashed/dotted) |
| Font Style | Define preferred font style |
| Category type | Keep „Default/Geofence“ or choose „General Base Mape“ for field reference geo-data, that can be imported in Projects page |
| Line Width | Define width for feature classes wit the type „Line“ |
| DXF/AutoCAD Layer Name | Choose file layer name for feature class when exported to AutoCAD file (included in exported project data from Projects page) |
| Export Sensor-Data | Check to include sensor data when exporting features collected using integrated hardware such as Leica Ultra and DigiCAT |
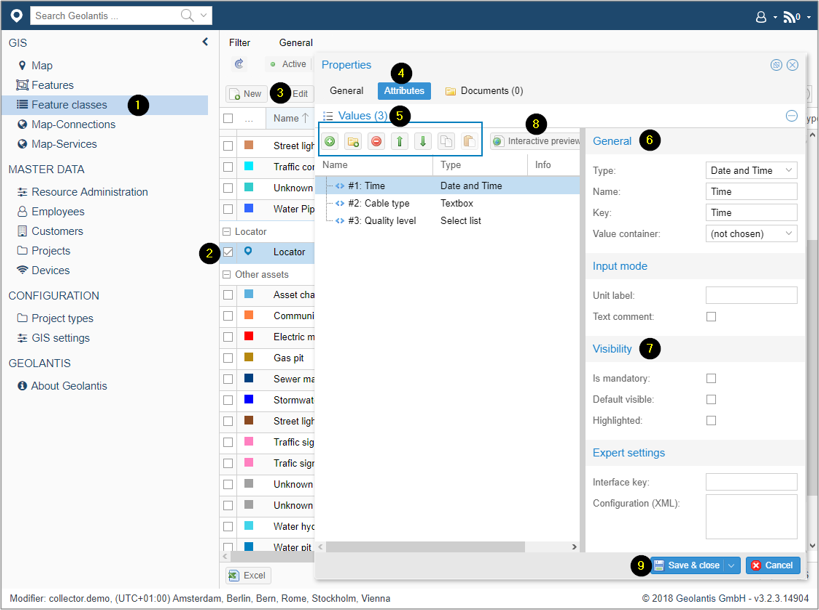
Configuring Feature Class Custom Attributes
Geolantis.360 provides special attributes customization for each feature class, that will be required as additional information in the field app when mapping features into a particular feature class.
- Set up customized feature class attributes as follows:
- Go to Feature Classes page
- Select feature class
- Click Edit to configure existing feature class
- Switch to „Attributes“ tab
- Add and organize attribute values
- Configure attribute General settings
- Configure attribute Visibility options
- Use the Interactive preview to verify the created attribute
- Save and close the properties window
Important Tips:
1- Click here to learn more about mapping interconnected lines and points
2- Inactive feature classes can be displayed as a layer in the mobile field app but they cannot be edited or updated unless they are set back as active