Attribute Editor Overview
Geolantis.360 provides an intelligent yet user-friendly attribute editor offering a variety of attribute types in addition to advanced options that allow flexible and dynamic attribute configuration. The attribute editor is used to customize attributes of Feature Classes, Task Types, Form Management, and Project Types.
The attribute fields created using the attribute editor are enabled instantly through Geolantis.360 web portal for the field App users so that they can record data in a standalone form or through a dispatched field task.
To find the attribute editor, go to any of the pages Feature Classes, Task Types, Form Management, or Project Types and click on New or Edit. In the Edit screen, switch to the Attributes (Values) tab where customized attribute fields can be created and configured.
Managing Attributes
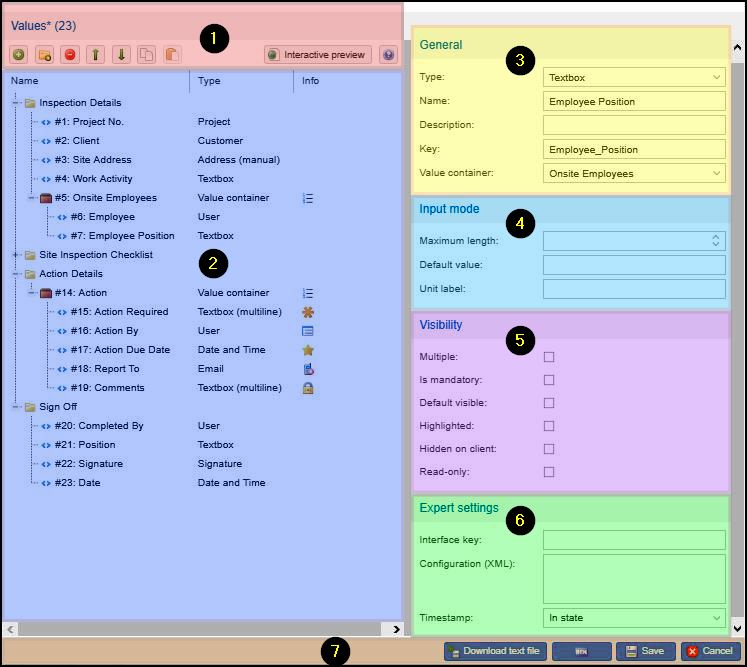
Use the attribute editor to create and modify attribute fields and organize their layout. The attribute editor in Geolantis.360 consists of the following sections:
- Attribute Controls
- Attributes List
- Attribute General Parameters
- Attribute Input Mode Configuration
- Attribute Visibility Options
- Attribute Expert Settings
- Supplementary Options
1. Attribute Controls
Use the attribute controls described below to build a form layout. The layout can be divided into several sections by grouping attribute fields into a major layout group or into a minor value container. This allows duplicating a set of multiple attributes at a glance when needed.
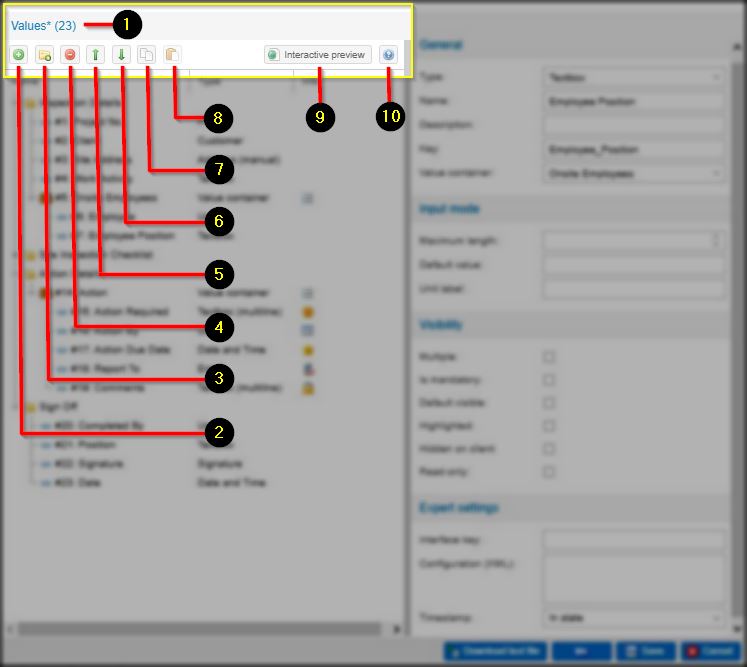
| 1 | The values number indicates how many attributes are included in the attributes list | |
| 2 | Insert a new attribute field | |
| 3 | Create a new layout group which combines a set of sub attributes including value containers | |
| 4 | Delete attribute fields, value containers, or layout groups. Deleting value containers or layout groups will move their dependent attributes to the root level. | |
| 5 | Use the Up Arrow to move entries from a lower order priority to a higher order priority | |
| 6 | Use the Down Arrow to move entries from a higher order priority to a lower order priority | |
| 7 | Copy an individual attribute field, or layout groups or value containers including their dependent attributes | |
| 8 | Paste an individual attribute field, or layout groups or value containers including their dependent attributes | |
| 9 | Use the interactive preview to revise the general layout and the included attributes | |
| 10 | Click the help icon to read information about the expert settings of certain attribute types | |
2. Attributes List
The attribute list shows the structure of the layout as well a the actual configuration setup of each attribute field.
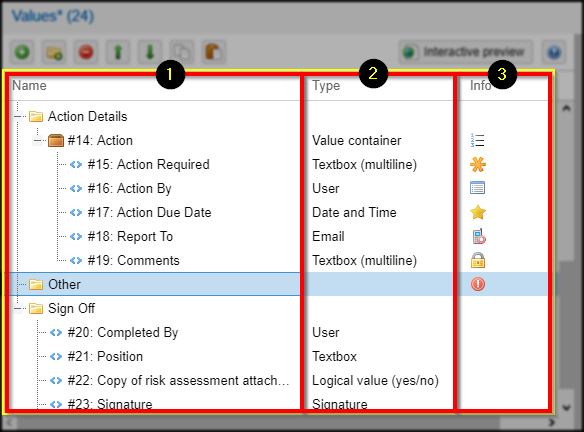
| 1 | Name | Each attribute field starts with its sequence order number followed by the given attribute name | |
| Indicates an attribute field entry (the lowest ranking in the attribute list hierarchy) | |||
| Indicates a value container entry (the second ranking in the attribute list hierarchy). A value container entry can be created as a normal attribute field, and can contain other attribute fields as sub-entries. | |||
| Indicates a layout group entry (the highest ranking in the attribute list hierarchy). A layout group entry can contain value container as a sub-entry, including the attributes within the value container. Layout groups can also contain individual attributes entries directly. | |||
| 2 | Type | The Type column lists the actual attribute type | |
| 3 | Info | The Info column lists each given visibility option(s) to the attribute field. The error indicator |
|
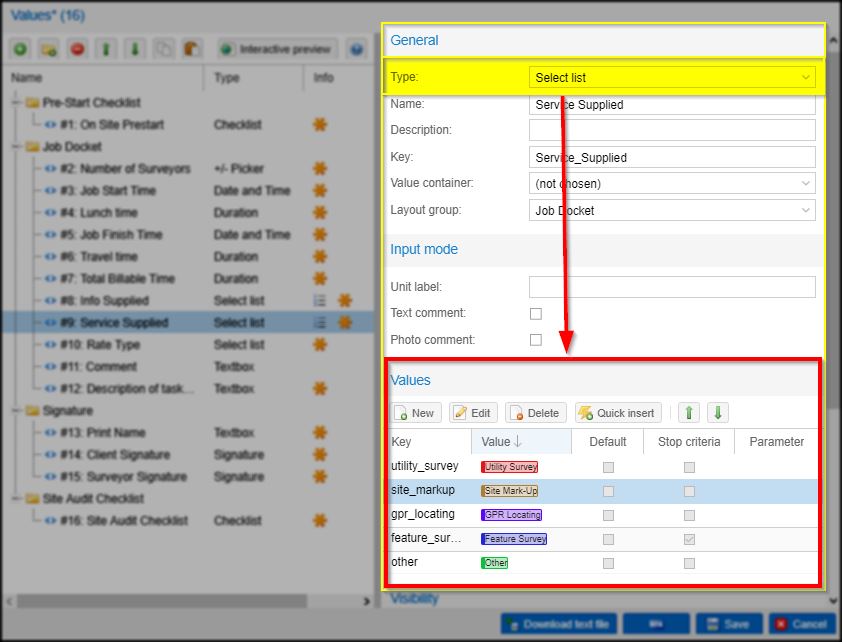
3. Attribute General Parameters
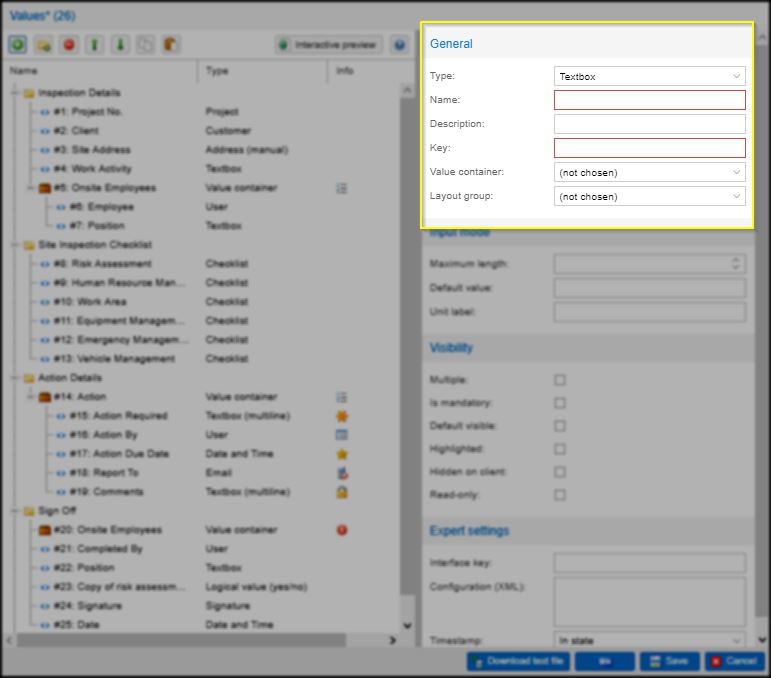
Configure the attribute General parameters as follows:
| Type | Choose one of the given attribute types in the list. The attribute types list may differ depending on the context where the attribute editor is loaded (check the differences among the offered attribute types in Feature Classes, Task Types, Form Management, and Project Types) | |
| Name | Provide a unique name for the attribute | |
| Description | Provide a brief description and instructions about the purpose of the attribute | |
| Key | If the key value is not automatically generated, define a unique key value of the attribute (the key value is used to fetch data from the recorded forms for reporting purposes) | |
| Value Container | Choose a value container if exists | |
| Layout Group | Choose a layout group if container if exists. If the attribute is included within a value container, the layout group option will be disabled. | |
4. Attribute Input Mode Configuration
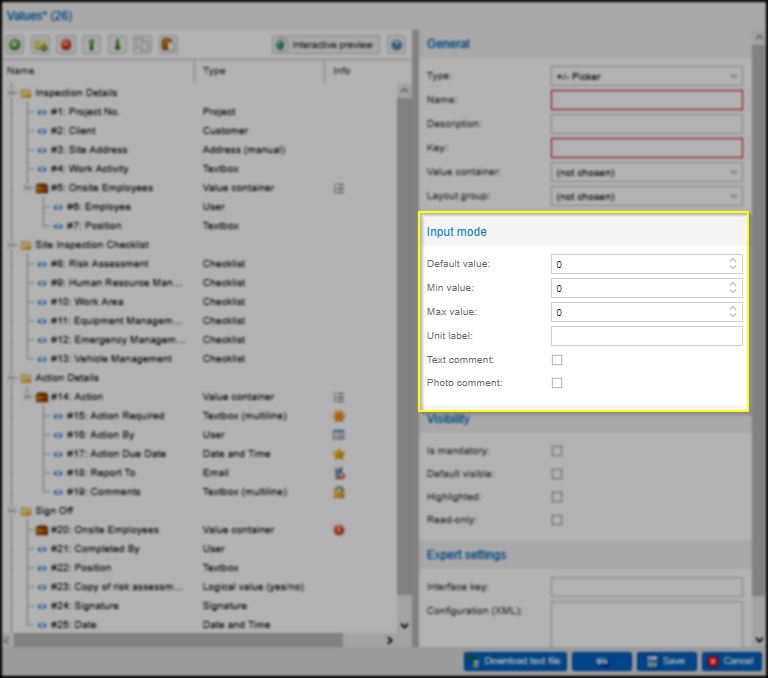
The Input mode options differ depending on the chosen attribute type. See below the possible cases of the input mode configuration:
| Option | Description |
| Maximum Length |
Define the maximum number of text characters. Valid for the attribute types: Textbox, Textbox (multiline) |
| Line Count |
Define the maximum number of text lines.
Valid for the attribute types:
Textbox (multiline)
|
| Default Value |
Specify a default attribute value that is
saved automatically unless the user
choses another value.
Valid for the attribute types:
-/+ Picker, Duration, Email, Number (Decimal),
Number (Integer), Phone, Photo,Select List,
Select list (with text input), Slider, Textbox,
Textbox (multiline), URL
|
| Min. Value |
Define a numerical lower limit of the
attribute value.
Valid for the attribute types:
+/- Picker, Duration, Number (Decimal),
Number (Integer), Textbox
|
| Max. Value |
Define a numerical upper limit of the
attribute value.
Valid for the attribute types:
+/- Picker, Duration, Number (Decimal),
Number (Integer), Textbox
|
| Decimal Places |
Specify the number of decimal places of
the numerical attribute values.
Valid for the attribute types:
Number (Decimal)
|
| Unit Label |
Set a reference display unit of the attribute
value. Unit Label can be a  text, a number or
a special character.
Valid for the attribute types:
All attribute types except Appointment, Value Container
|
| Text Comment |
Enable writing a text comment once an attribute
value is recorded.
Valid for the attribute types:
+/- Picker, Address (manual), Appointment,
Gps / Address recording, Project, Select list,
Select list (with text input), Slider
|
| Photo Comment |
Enable capturing a photo reference once an
attribute value is recorded.
Valid for the attribute types:
+/- Picker, Address, Address (manual),
Appointment, Employee, Gas pressure m.,
GPS / Address recording, Select List,
Select list (with text input)
|
| Enable Photo Editing |
Enable making marks and highlights on the
captured photo.
Valid for the attribute types:
Photo
|
| Checklist |
Enable choosing a pre-configured checklist. Valid for the attribute types: Checklist |
| Checklist from Task |
Enable fetching checklist data from tasks.
Valid for the attribute types:
Checklist
|
| Activity |
Enable on of the time recording activities.
Valid for the attribute types:
Project time
|
| Signature Type |
Choose if the signing person'name'
is not needed, optional, or required.
Valid for the attribute types:
Signature
|
| Signature Terms |
Enable the signing person to provide additional
signature terms.
Valid for the attribute types:
Signature
|
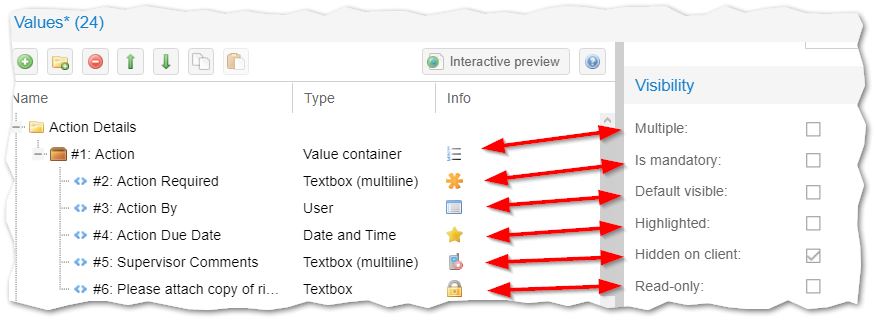
5. Attribute Visibility Options
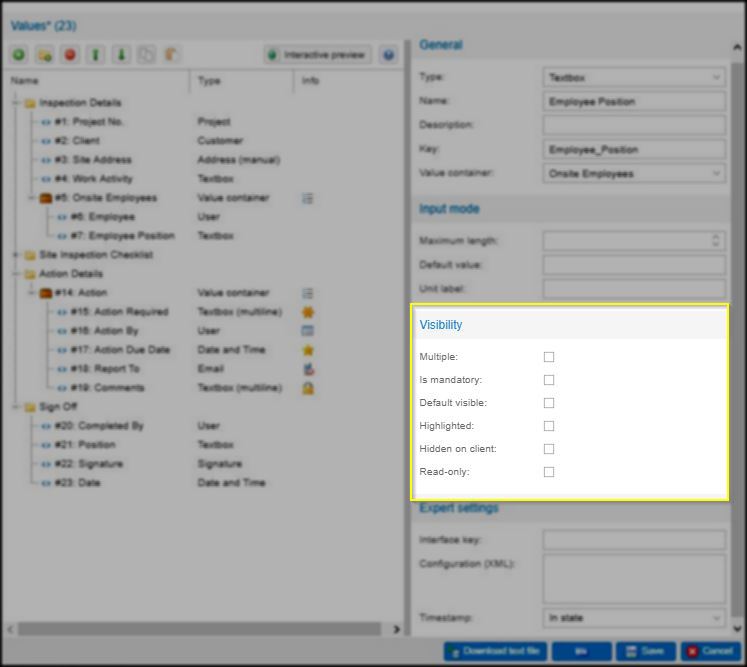
The following visibility options can be specified depending on the selected attribute type:
| Option | Symbol | Description |
| Multiple | Enable the mobile field App users to provide multiple value entries of a single attribute or a set of attributes grouped within a value container | |
| Is Mandatory | A form cannot be completed unless all mandatory attribute values are filled out | |
| Default Visible | A default visible attribute will be shown automatically in the recorded form attribute columns | |
| Highlighted | A highlighted attribute appears in a bold text in the mobile field App | |
| Hidden on Client | The attribute will not be visible for users in the mobile field app | |
| Read-only | The attribute will displayed as a static text and cannot be edit by users in the mobile field app |
Specify one or multiple visibility option for any attributes when needed. The visibility option symbols appears in the Info column in the attributes list.
6. Attribute Expert Settings
In the Expert Settings section, define an advanced configuration for any attribute. The expert settings differ from one attribute type to another.
7. Supplementary Options
| XML Editor | Available in the attribute editor of Feature Classes, Project Types, and Task Types. | |
| Keyboard saving shortcuts | Available in the attribute editor of Feature Classes, Project Types, and Task Types. | |
| Configuration History | Available in the attribute editor of Feature Classes, Project Types, and Task Types. | |
| XML Viewer | Available in the attribute editor of the Form Management. | |
| Download XML (text file) | Available in the attribute editor of the Form Management. | |
Extended Options
Value Entries
For certain attribute types such as Slider, Select List, or Select list (with text input),the additional ‘Values’ section appears where entries of the selected attribute can be created and configured.
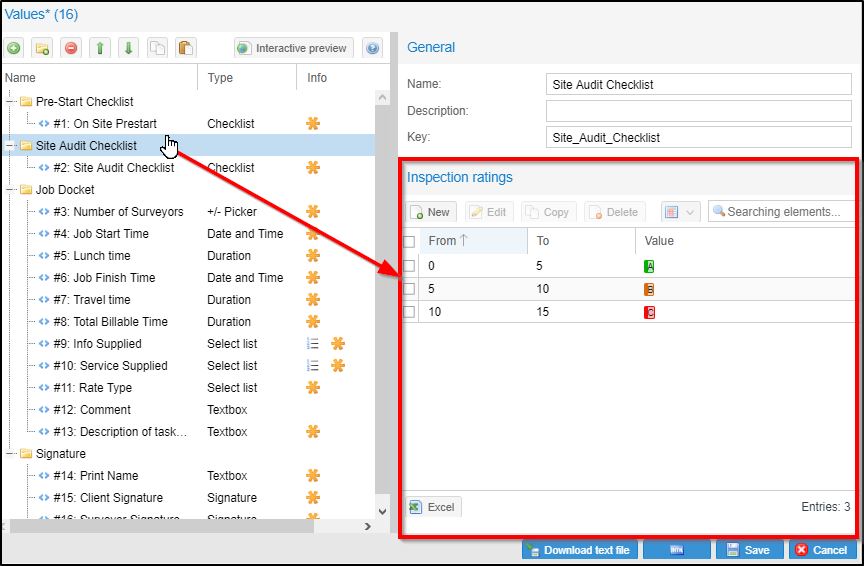
Inspection Ratings
In the Form Management attribute editor, additional Inspection Rating entries can be customized for a layout group, or for the entire form to monitor and control a certain level of data quality. This allows defining evaluation ratings of collected data by the field users.